Schedule a Job on the TTD by MES
The scheduling of a Job on the TTD by the MES is done in the following steps:
- For each Job the MES wants to schedule on the TTD the MES creates an Object of the type 7:ISA95JobOrderDataType and sends it to the TTD by calling either the Method Store or the Method StoreAndStart on the 8:JobOrderControl Object located in the 8:JobManagement on the TTD.
- The TTD takes the 7:ISA95JobOrderDataType, embeds it in a 7:ISA95JobOrderAndStateDataType and stores it in the 7:JobOrderList attached to the 8:JobOrderControl Object.
Figure 11 shows an “Example Job” in a proprietary Software on a proprietary TTD and Figure 12 shows the corresponding JobOrder as the 7:ISA95JobOrderDataType.
Figure 12 shows the scheduling of the “Example Job” on the TTD and the 7:JobOrderList that results.
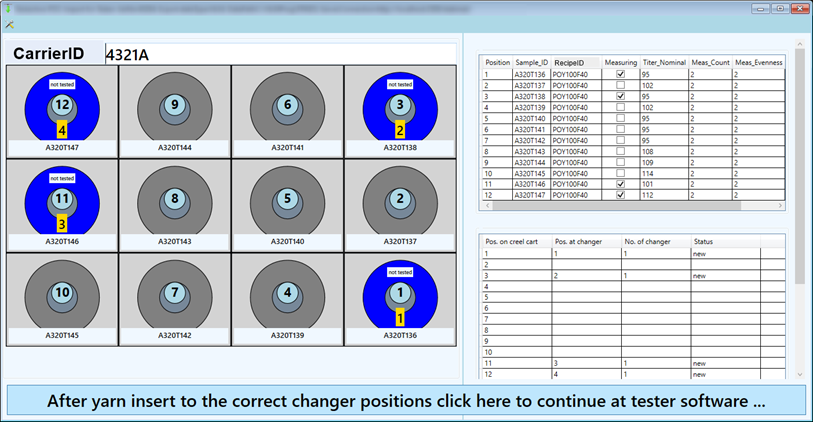
Figure 11 – Example of a test job on a proprietary TTD
The following properties are used for the test job:
- CarrierId: 4321A
- CarrierTypeId (Not shown in the figure): 1 (means 4x3 here, but is custom by the vendor)
- RecipeId: POY100F40
- Meas_Count: 2, Meas_Eve: 2, Meas_Force: 50 (combined in NumberOfTests[])
- Sample_ID: A320T136 | A320T138 | A320T146 | A320 T147, Titer_Nom: 95 | 95 | 101 | 112, Pos. on carrier: 1 | 3 | 11 | 12 (combined in SampleInfos[])
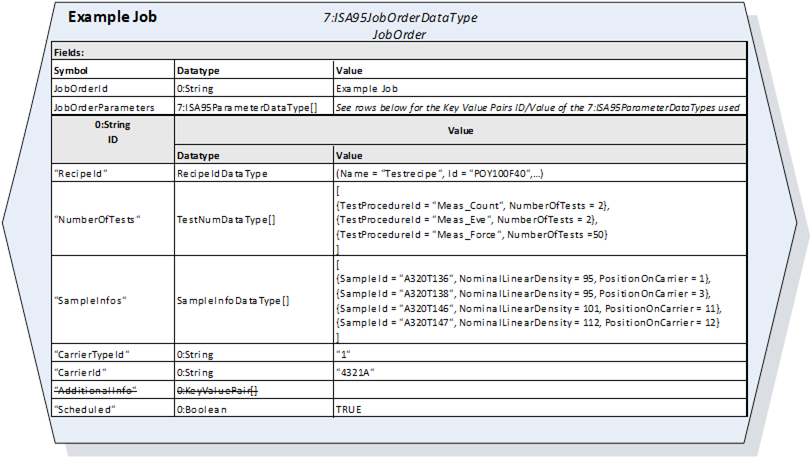
Figure 12 – Example of a test job as 7:ISA95JobOrderDataType Object
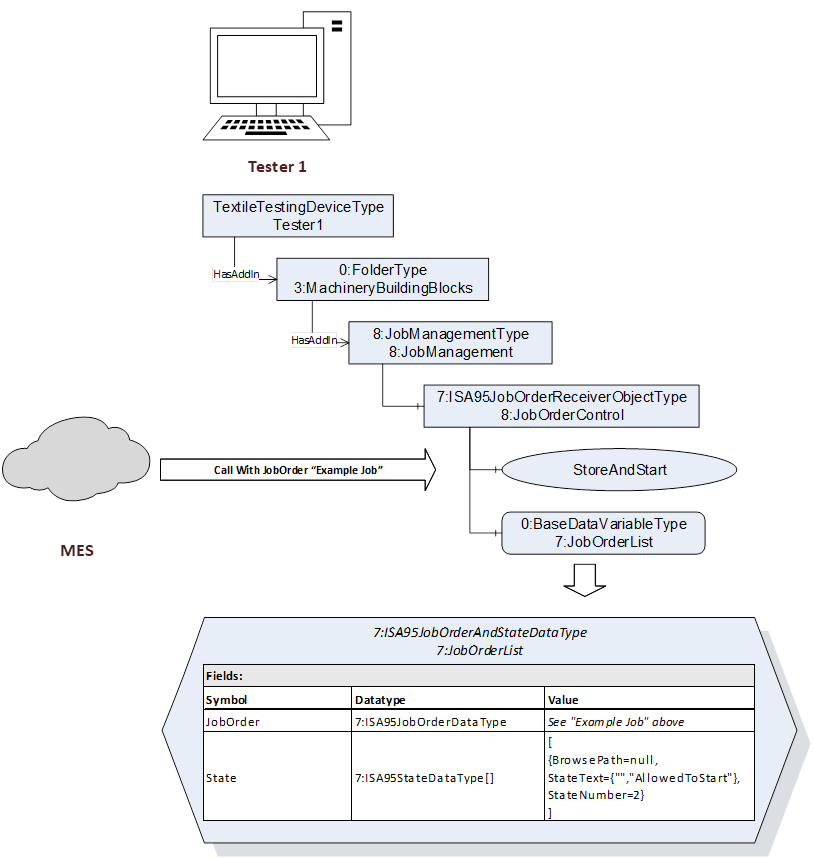
Figure 13 – Scheduling the "Example Job" on the TTD
Add additional custom properties to a job
In the 7:ISA95JobOrderDataType additional information like e.g. print information that should be displayed on a result sheet can be added to a job. For this use case an one-dimensional array of 0:KeyValuePair can be included in the 7:JobOrderParameters of the 7:JobOrderDataType. This 0:KeyValuePair has a 0:QualifiedName as key and a 0:BaseDataType as value. This enables implementors to use any DataType as value and process it as needed. However, some consideration has to be taken for the qualified name.
As the properties used in the AdditionalInfo have a custom/vendor specific character the 0:QualifiedName should use the namespace of the vendor (if specified) or the instance namespace of the TTD.
Recipe management
The main purpose of the recipe management is to get the available recipe ids that are stored on the TTD.In addition to that some optional Methods can be implemented for the purpose of uploading recipes to the TTD, downloading recipes from the TTD and interchanging recipes between TTDs of the same type. Anyway, the content of the recipes are vendor and machine specific and treated as raw data, and therefore not interpreted by OPC UA.
The recipe ids stored on the TTD can be obtained in two ways. Either by reading the RecipeIds property or by invoking the GetRecipeIds Method. Both nodes are located under the RecipeManagement.
Figure 14 depicts the two possibilities to retrieve the RecipeIds from the TTD.

Figure 14 – Retrieving RecipeIds from the TTD
Mainly for the purpose of interchanging recipes between TTDs of the same type, some optional Methods were added to the TTD. This Methods are:
- GetRecipe/GetRecipes that retrieves one or multiple Recipes from the TTD. A Recipe consists of the RecipeId meta data and its associated content.
- SetRecipe/SetRecipes that stores one/multiple Recipes on the TTD. A Recipe consists of the RecipeId meta data and its associated content.
- DeleteRecipe that deletes a recipe from the TTD with a given recipe id.

Figure 15 – Recipe transfer between TTDs
Retrieving results for Scheduled / Non-scheduled job (Result management)
First of all it is to be said, that the process of retrieving measurement/testing results is independent of the fact if the Job was scheduled by a client or not.
In general results that are managed by the TTD have a unique ResultId property that is used to handle the results in the communication with the client (MES). The assignment of a Result to a sample or a measurement /test is done via additional properties that are added to the TTDResultMetaData. These properties are:
- SampleId
- TesterJobId
- TesterSampleResultId
- ProductInstanceUri
- 7:ISA95JobOrder (Includes the jobId for Scheduled jobs.)
The kind of the Result is determined by the properties and its ResultContent:
- HasTransferableDataOnFile indicates that a Filetransfer is possible (Transfer of testreports)
- ResultContent is present if statistical testresults are available (StatisticResultContentDataType)
- resultUri this array with URIs is present and contains URIs if complete test results are available
Handling of Errors, Warnings and Prognosis (Maintenance and Calibration)
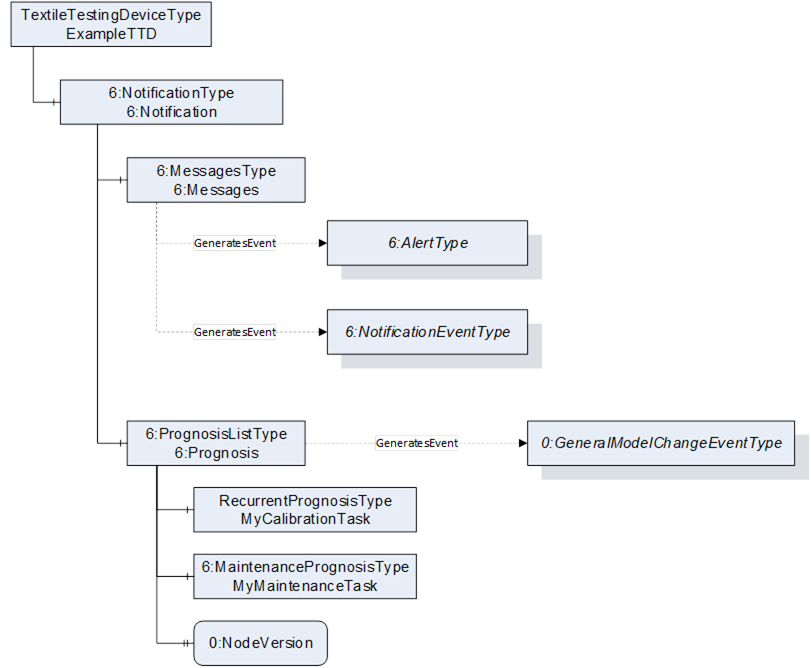
Errors, warnings and prognoses are managed under the 6:Notification node inside the TTD. As you can see in Figure 16, the 6:Notification node has two (optional) child nodes 6:Messages and 6:Prognoses. The 6:Messages node is used for sending events like errors, warnings and messages. The 6:Prognosis contains a list of the current prognoses (e.g. maintenance or calibration tasks) for the TTD. The list can be used dynamically or statically. When used statically the Objects in the AddressSpace stay the same during the runtime of the Server. No nodes are added or deleted. When used dynamically, Nodes in the AddressSpace are added and deleted as necessary: every time a new Prognosis is calculated, a respective object is added to the list of prognoses. As soon as the predicted task occurred, the Object in the AddressSpace is deleted. In the case of dynamic usage, each modification of the Prognosis list will trigger a GeneralModelChangeEvent to inform Clients (MES) about the change.
Figure 16 shows a sample implementation for the 6:Notification Node.

General process of schedule a Job and retrieving results
This section describes the general process of creating a job, processing the job and retrieving its results. The general processing of a job can be roughly divided into the following steps:
- A Client (MES) schedules a Job on the TTD by invoking the Store Method on the TTD.
- The TTD inserts the Job into its 7:JobOrderList.
- At some later point, an Operator at the TTD picks a Job from the 7:JobOrderList and starts it.
- The TTD processes the Job (with assistance of the operator) and generates the result(s) for this job.
- After results are generated, the TTD informs the MES about new Results with a TTDResultReadyEvent.
- The Client (MES) retrieves the new results.
Figure 17 shows this sequence. Following pictures relay on the “Example Job” JobOrder shown in Figure 12.
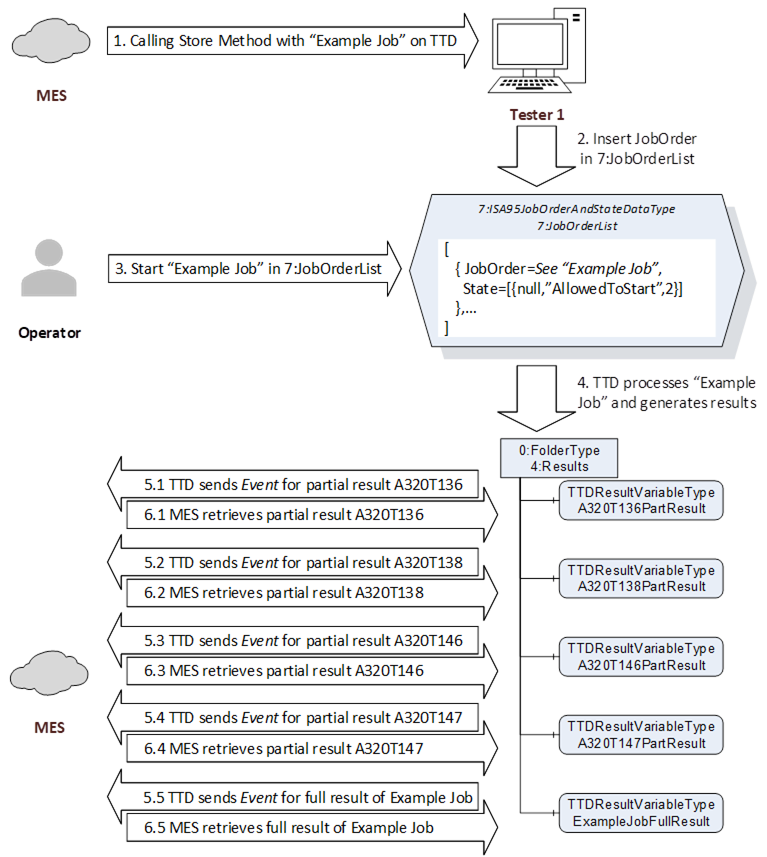
Figure 17 – Processing a JobOrder and retrieving results
Figure 18 shows two examples for results generated by the TTD for the Example Job JobOrder.
